Free Standard Shipping on All Orders $285+
Instructions for Use (IFU)
Product Allergens
See any common allergens this product may contain >>Price breaks are offered on most items...
This amount is an estimate based on retail price. The actual amount due (shown at the final stages of your order) may be different from what is displayed here.
Return Policy
Items returned within 30 days of purchase with a return authorization number on the outside and inside of the return box will be credited 100%. Product returned between 31 and 60 days from purchase date is subject to a 20% restocking fee. Ultradent will not accept returns after 60 days. Errors in shipment must be reported within 14 days of invoice date. All return authorization numbers become invalid 90 days after date of issue. A return authorization number must accompany all returns to receive proper credit. Please contact Customer Service at 800.552.5512 for assistance.
Limited Warranty
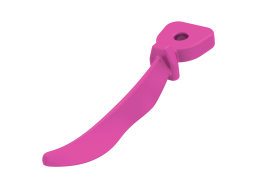
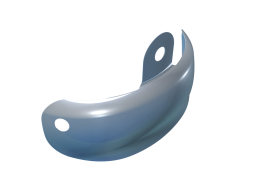
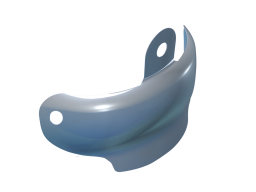
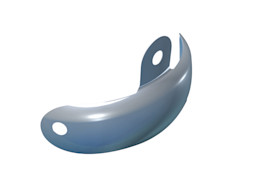
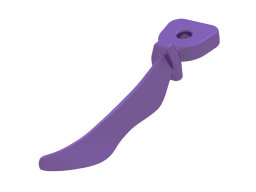
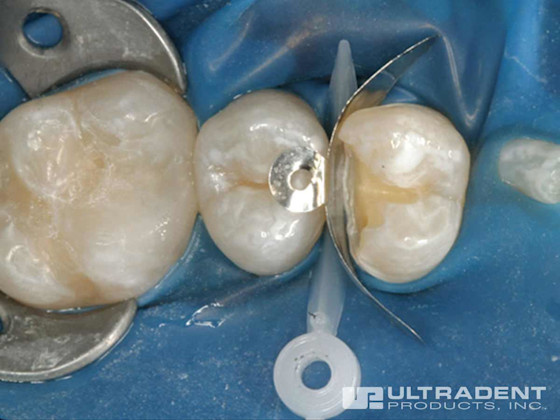
The V3 Tab-Matrix has a pronounced ridge on the occlusal margin, producing completely natural-looking Class II composite restorations that require minimal finishing, saving time, money, and effort.
- Advanced anatomical features
- Marginal ridge saves effort and money
- Vertical contour is easy on the gingival margin
- Gingival apron is properly shaped to commonly encountered cavity form, avoiding gaps in the gingival-axial corner
- Superthin (30μm) but strong
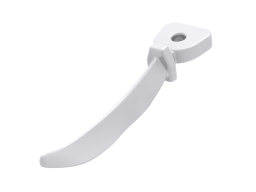
- Tab makes handling with Triodent® Pin-Tweezers easy

Technical Details
Natural Anatomy
Easy to Grip
Patient Friendly
Clinicals
Advanced Anatomical Design

Procedures
V3 System
See Instructions for Use for complete instructions, warnings, and precautions.
Step 1
Pre-wedging prevents bleeding during cavity prep. Even better, a Triodent® WedgeGuard will protect the papilla/rubber dam and the adjacent tooth as well. Push the wedge or WedgeGuard in firmly from the lingual or buccal side and proceed with prep.
Step 2
If using a WedgeGuard, detach the guard after prep, leaving the wedge behind. A mirror can be used to hold the wedge in place while the guard is removed.
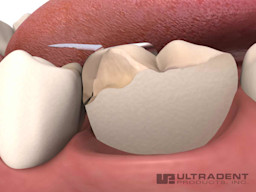
Step 3
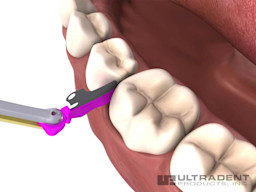
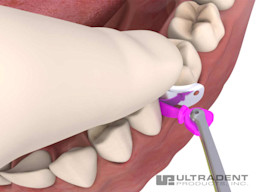
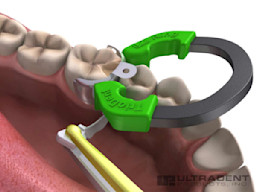
Slide matrix into embrasure.
Grip the tab of a Triodent® V3 Tab-Matrix with Triodent® Pin-Tweezers, ensuring that the gold side of the tweezer tips will be facing away from the tooth. Fold the tab towards you so you can slide the matrix apically into the gingival crevice. If necessary, withdraw the wedge slightly then place the matrix. Now trap the tab of the matrix against the neighboring tooth, and then reinsert the wedge.
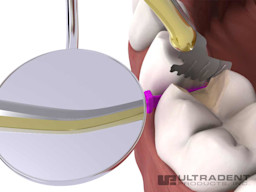
Step 4
Make small adjustments to ensure the matrix band is at the right height to get maximum benefit from the contour, particularly the rolled marginal ridge, as seen in this cross-section.
Step 5
If you are not using a WedgeGuard or prefer not to pre-wedge, you may cut the prep first, then place the matrix and then the wedge.
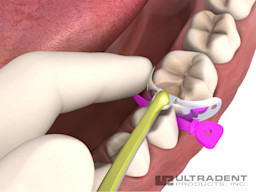
Step 6
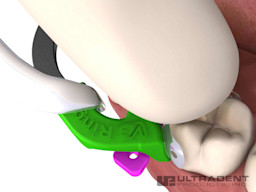
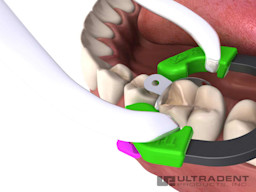
Ask your assistant to pass you a V3 Ring—green for molars, yellow for premolars and primary teeth—already in the forceps with the lock on. Do not rush this next step: Using a finger-rest to steady the forceps, place the ring as low as possible with the tines straddling the wedge. When releasing the forceps, use a finger to press down on the matrix tab to prevent movement.
Step 7
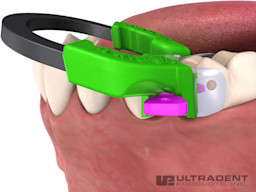
This image shows the V3 Ring in position from the buccal view. Note how the tips of the tines are close to the gingival margin and the V-slot of the V3 Ring is touching the wedge. Make sure that the ring is in direct contact with the wedge and will not move any further in an apical direction.
Step 8
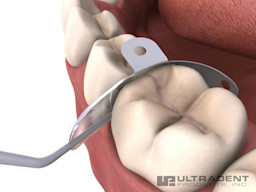
Often it is best to place the V3 Ring distally for better view and access, even with an MO.
Step 9
The V3 System allows a second wedge to be placed from the other side, even without removing the ring first. The second wedge can be fitted underneath the first as shown above. This feature enables you to easily adjust the wedging without starting over.
Step 10
Break the bond between the matrix and the composite by pushing a thin, metal-blade instrument through the embrasure below the contact point.
Step 11

Grip one of the matrix wing holes with Pin-Tweezers and wriggle the matrix gently. If the matrix moves, it is free of the composite and can be removed.
Testimonials

Dr. Patrick Yoshikane –
Dr. Patrick Yoshikane talks about switching from a traditional Tofflemire to the Triodent V3 sectional matrix system and how it changed the way he performs Class II restorations.

Dr. Nick Devani –
Dr. Nick Devani talks about switching from a traditional Tofflemire to the Triodent V3 sectional matrix system and how it changed the way he performs Class II restorations.
“The adaptability, security and position of the Universal V3 and Narrow V3 with their accompanying matrices are second to none when placing composites. They have far outperformed any other system I have used.”
Marshall C Fields, DMD – Columbia, SC
“I’ve tried them all and the V3 system, when used correctly with the Wave-Wedges and V3 Matrices, is hands-down the best! Trust me, you’ll never look back. Triodent’s innovation has made dentistry more fun!”
Komson Sudhi, DDS – Plano, TX
“You folks have certainly done a great job with your separators and matrices. It’s made my work a lot easier.”
Leon L. Wiggin, DDS – Oneonta, NY
“I have been a loyal customer of Triodent from your first appearance on the US market many years ago. I have tried all the other matrix systems—Palodent, Garrison, Contact Pro—but only your system has met my requirements for broad, tight contacts. I am a customer for life.”
Bob Kogen, DDS – Newhall, CA
“After 20 years searching, I think the V3 is the best matrix system out there. Thanks for your outstanding, lifesaving product.”
Robert Ho, DDS – San Francisco, CA
“Using the Triodent V3 has been an outstanding restorative experience. I thought my methods and materials for restorative procedures were at the highest level, then I purchased Triodent’s V3 system. After the first restoration I could see how much greater adaptation, better contours and tighter contacts this system creates. I am thoroughly impressed and delighted with this product.”
Dr. Ken Banks – Inwood, WV
“The V3 was my best purchase of the year. My fillings are better and easier than ever.”
Dr. Noam Kranz – New Milford, NJ
Frequently Asked Questions
-
How do I use the tab on the V3 Tab-Matrix?
-
How do I prevent the little tab blocking my view of the cavity?
-
How do I remove the V3 Tab-Matrix if it appears to be stuck?
-
How do I keep the V3 Tab-Matrix in place while inserting a Wave-Wedge?
-
Can I place the V3 Tab-Matrix after placing the wedge?
-
How can I be sure that the composite has completely cured inside the V3 Tab-Matrix?
-
How do I get the greatest benefit out of the rolled marginal ridge on the V3 Tab-Matrix?
-
How can I stop hooking the tab of the V3 Tab-Matrix when I go to release the Pin-Tweezers?
-
When doing an MOD, the matrix band side extrusions are too long and get in the way of the opposing matrix band.