Free Standard Shipping on All Orders $285+
Instructions for Use (IFU)
Product Allergens
See any common allergens this product may contain >>Price breaks are offered on most items...
This amount is an estimate based on retail price. The actual amount due (shown at the final stages of your order) may be different from what is displayed here.
Return Policy
Items returned within 30 days of purchase with a return authorization number on the outside and inside of the return box will be credited 100%. Product returned between 31 and 60 days from purchase date is subject to a 20% restocking fee. Ultradent will not accept returns after 60 days. Errors in shipment must be reported within 14 days of invoice date. All return authorization numbers become invalid 90 days after date of issue. A return authorization number must accompany all returns to receive proper credit. Please contact Customer Service at 800.552.5512 for assistance.
Limited Warranty
Used with the Triodent® V3 Ring, the Wave-Wedge with its “wave”shape has the unmatched capability of sealing the matrix at the gingival margin while being rigid enough to provide tooth separation. Multiple Wave-Wedges can be easily stacked for the procedure if needed.
- Self-guiding for ease of placement
- Design accommodates gingival tissue and is stackable
- Strong, anatomical design
- Fine wave-shaped wings compress on entry and flare again upon exit for easy placement and ultimate seal
- Hollow underside allows another wedge to be placed from the opposite side of the embrasure


Technical Details
Unsurpassed Sealing
Gentle on Papillae
Easy Placement
Clinicals
Anatomical Design

Procedures
V3 Wave-Wedge
See Instructions for Use for complete instructions, warnings, and precautions.
Step 1
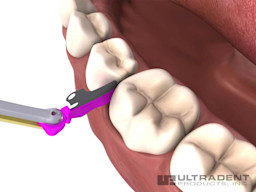
Pre-wedging prevents bleeding during cavity prep. Push the Wave-Wedge (or the Triodent® WedgeGuard as shown here) in firmly from the lingual or buccal side and proceed with prep.
Step 2
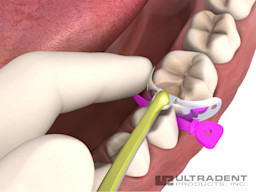
Grip the tab of aTriodent® V3 Tab-Matrix with Triodent®Pin-Tweezers, ensuring that the gold side of the tweezer tips will be facing away from the tooth. Fold the tab towards you so you can slide the matrix apically into the gingival crevice. If necessary, withdraw the wedge slightly then place the matrix. Now trap the tab of the matrix against the neighboring tooth, and then reinsert the wedge.
Step 3
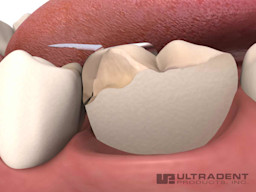
Make small adjustments to ensure the matrix band is at the right height to get maximum benefit from the contour, particularly the rolled marginal ridge, as seen in this cross-section.
Step 4
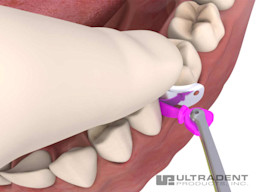
If you prefer not to pre-wedge, you may cut the prep first, then place the matrix and then the wedge.
Step 5
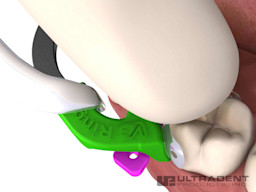
Ask your assistant to pass you a Triodent V3 Ring—green for molars, yellow for premolars and primary teeth—already in the forceps with the lock on. Do not rush this next step: Using a finger-rest to steady the forceps, place the ring as low as possible with the tines straddling the wedge. When releasing the forceps, use a finger to press down on the matrix tab to prevent movement.
Step 6
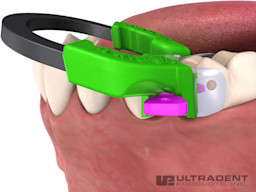
The image above shows the V3 Ring in position from the buccal view. Note how the tips of the tines are close to the gingival margin and the V-slot of the V3 Ring is touching the wedge. Make sure that the ring is in direct contact with the wedge and will not move any further in an apical direction.
Step 7
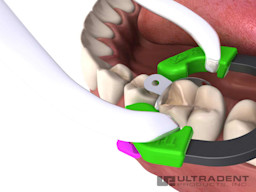
Often it is best to place the V3 Ring distally for better view and access, even with an MO.
Step 8
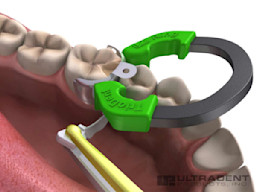
The V3 System allows a second wedge to be placed from the other side, even without removing the ring first. The second wedge can be fitted underneath the first as shown above. This feature enables you to easily adjust the wedging without starting over.
Step 9
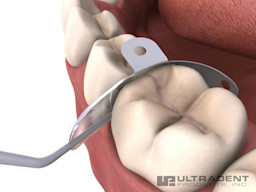
Break the bond between the matrix and the composite by pushing a thin, metal-blade instrument through the embrasure below the contact point.
Step 10
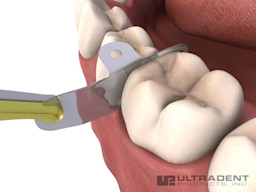
Remove matrix.
Grip one of the matrix wing holes with Pin-Tweezers and wriggle the matrix gently. If the matrix moves, it is free of the composite and can be removed.
Testimonials
Dr. Patrick Yoshikane –
Dr. Patrick Yoshikane talks about switching from a traditional Tofflemire to the Triodent V3 sectional matrix system and how it changed the way he performs Class II restorations.
Dr. Nick Devani –
Dr. Nick Devani talks about switching from a traditional Tofflemire to the Triodent V3 sectional matrix system and how it changed the way he performs Class II restorations.
“The pre-wedging step allows you to get a great contact every time. And the interproximal contours are outstanding.”
Mark M. Ortinau, DDS, FAGD, FICD – Ellisville, MO
“The system is so quick and easy to use and my favorite part is still the wedges that mimic the gingival papillae.”
Donald J. Annicelle, DDS – Trumbull, CT
“I love, really love, the Wave-Wedges. They are gentle to papillae and stay in place well.”
Julie Gillis, DDS – Grand Junction, CO
Frequently Asked Questions
-
What can I do if there is a gap at the bottom of the axial corner of the box with the Wave-Wedge in place?
The Wave-Wedge, because of its unique central concavity, has exceptional sealing capacity on the matrix at the gingival margin. However, if there is a gap, you can wedge from both sides, thanks to the hollow underside which allows you to stack the wedges. -
The point of the Wave-Wedge is quite sharp. Will it cut the gingival papillae?
The Wave-Wedge's banana-shape design and tapered tip ensures the wedge is self-guiding, gliding through the embrasure without catching on the papillae. Moreover, because of the hollow underside, the papillae is accommodated and protected during the restoration. That is why the Wave-Wedge is ideally placed BEFORE cavity prep. Lubricating the tip of the wedge with a water-based lubricant or LA paste will also help it slide through without catching the rubber dam. -
Apart from the adaptive sealing qualities, what are the reasons for the central concavity in the Wave-Wedge?
The central concavity is actually the second feature in the Wave-Wedge's remarkable bag of tricks. First come the fine lateral wings at the point of the wedge. These compress easily as the wedge enters the embrasure, and then expand again as the wedge exits on the other side of the tooth. This is when the concavity comes into its own, effectively locking the wedge into place at its central point, and wrapping around the matrix at the gingival margin for a broad, adaptive and symmetric seal. It is also then in the best spot for positioning the V3 Ring. -
What is the hole for in the end of the Wave-Wedge?
While other wedges are easily dropped, Wave-Wedges and Triodent® V-Wedges are secure in Triodent's Pin-Tweezers, which, as the name implies, have a pin in the end that goes into the hole. Because of the cross-over action of the Pin-Tweezers, the wedges will not fall out when the tweezers are held in a neutral position, and are very secure when the tweezers are gripped. -
Do Wave-Wedges separate the teeth?
Unlike the Wave-Wedge and the Triodent V-Wedge, most wedges have a conflict of function, needing to be hard enough to separate the teeth but soft and adaptive enough to provide a seal at the gingival margin. Triodent gives the job of separating the teeth to the V3 Ring, leaving the Wave-Wedge free in the role of holding the matrix and sealing the gingival margin.


