

Free Standard Shipping on All Orders $285+
Instructions for Use (IFU)
Safety Data Sheets (SDS)
Product Allergens
See any common allergens this product may contain >>Price breaks are offered on most items...
This amount is an estimate based on retail price. The actual amount due (shown at the final stages of your order) may be different from what is displayed here.
Return Policy
Items returned within 30 days of purchase with a return authorization number on the outside and inside of the return box will be credited 100%. Product returned between 31 and 60 days from purchase date is subject to a 20% restocking fee. Ultradent will not accept returns after 60 days. Errors in shipment must be reported within 14 days of invoice date. All return authorization numbers become invalid 90 days after date of issue. A return authorization number must accompany all returns to receive proper credit. Please contact Customer Service at 800.552.5512 for assistance.
Limited Warranty
PermaFlo DC luting resin is the most versatile product within Ultradent's family of cements. It is ideal as a luting material for crowns, bridges, inlays, and onlays and can also be used for endodontic post cementation and fabrication of core buildups. As a highly filled dual-cure composite/luting restorative resin, PermaFlo DC luting resin provides maximum strength and durability.
- Multiple uses including post cementation, core buildup, and luting
- Highly filled (70% by weight)
- Thixotropic with low film thickness (8 µm)1
- Wear resistant
- Maximum strength
- Radiopaque
- Low polymerization shrinkage
- Self-mixing
- 2.5 minutes working time, 5–8 minutes set time
- Use with Ultradent™ Mixing tip and IntraOral tip
- Certified gluten free
![]()
Technical Details
Versatility
Use PermaFlo DC luting resin to lute inlays, onlays, crowns, and bridges. It can be used with porcelain, lithium disilicate, zircona, porcelain fused to metal, metal alloys, leucite-based ceramics, alumina-based ceramics, mica-based ceramics, gold, and composite.
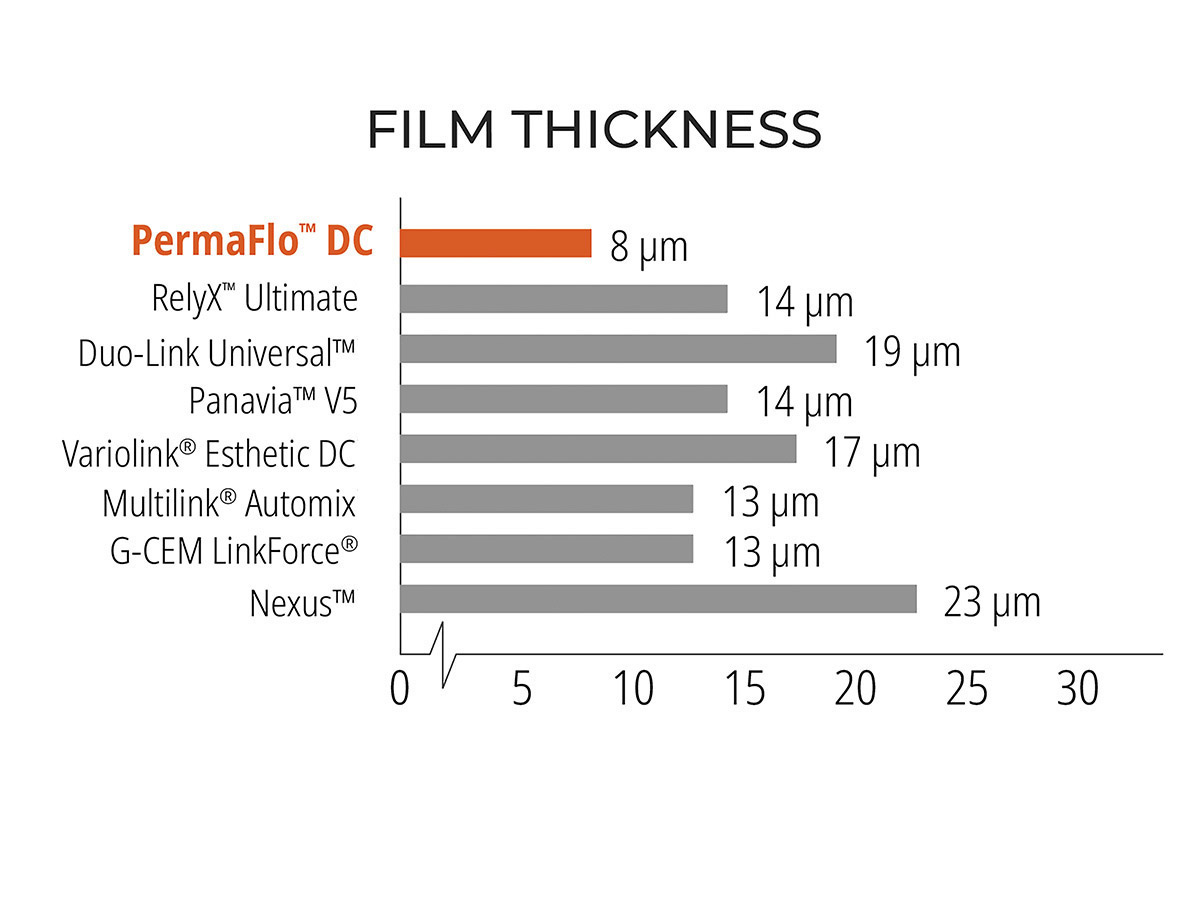
Lowest Film Thickness in a Luting Composite Resin
 1
1
PermaFlo DC resin has the lowest film thickness known for a composite luting resin.1 Film Thickness (in μm).
Available in Four Shades
PermaFlo DC luting resin is available in A2, A3.5, Translucent, and Opaque White shades.
Sold Directly to Licensed Dental Professionals Only
Ultradent is committed to supporting the dental community. PermaFlo DC luting resin is only sold directly to licensed dental professionals.
Clinicals
Syringe Delivery

The Intraoral tip snaps onto the dual-barrel mixing tip for precise placement of luting material.

Adhesive luting for crowns, bridges, inlays, and onlays. With syringe/tip delivery, a crown is loaded from depth of crown to ensure no air entrapment.
Use From Post to Crown


PermaFlo DC resin is a versatile dual-cure resin formula that can be used to cement endodontic posts and fabricate core buildups.

Procedures
Indirect Luting Guide—Prosthesis Preparation
See Instructions for Use for complete instructions, warnings, and precautions.
Step 1

Step 2

Step 3

Step 4

Indirect Luting Guide—Total-Etch Technique
See Instructions for Use for complete instructions, warnings, and precautions.
Step 1

Scrub abrasive with the STARbrush™ brush to clean, disinfect, and remove any residual cement. Rinse and then air dry.
Step 2

Etch for 15 seconds with Ultra-Etch etchant (35% phosphoric acid) using the Blue Micro™ tip or Inspiral Brush tip.
Step 3

Rinse with water. Leave moist. Do not desiccate.
Step 4

Recommend: Apply Consepsis™ solution to preparation with the Black Mini™ Brush tip or other recommended tip.
Step 5

Use air and suction to remove excess. Leave slightly moist. Do not rinse.
Step 6

Attach Inspiral Brush tip or Metal-Dento Infusor™ tip to Peak™ Universal Bond adhesive syringe. If using bottle, place a few drops in a dish and use Micro Applicator.
Step 7

Apply puddle coat of Peak Universal Bond adhesive. Brush onto enamel and scrub into dentin for 10 seconds.
Step 8

Aggressively thin with full air pressure for 10 seconds with air and suction.
Step 9

Light cure Peak Universal Bond adhesive for 10 seconds with VALO™ curing light on Standard Power mode. Always use a barrier sleeve with VALO curing light.
Step 10

Ensure that both the base and catalyst are flowing. Attach mixing tip by lining up internal cap stems with syringe orifices. Twist tip clockwise to lock.
Step 11

Apply PermaFlo DC cement into prepared prosthesis and seat immediately. See Prosthesis Preparation section above.
Step 12

Fully seat prosthesis and tack cure. Remove excess cement.
Step 13

For translucent prostheses, cure for 20 seconds with VALO curing light in Standard Power mode. For non- or semi-translucent prostheses, allow to chemical cure for 5—8 minutes.
Indirect Luting Guide—For Self-Etch Technique Modify Steps 4 and 5 as Shown Below:
See Instructions for Use for complete instructions, warnings, and precautions.
Step 4

Apply Peak™ SE primer with the Black Mini™ Brush tip or other recommended tip. Scrub for 20 seconds.
Step 5

Remove excessive primer using air syringe with high volume suction directly over prep.
Endodontic Post Cementation Guide—Total-Etch Technique
See Instructions for Use for complete instructions, warnings, and precautions.
Step 1

Step 2

Step 3

Step 4

Step 5

Step 6

Step 7

Step 8

Step 9

Step 10

Step 11

Step 12

Step 13

Step 14

Step 15

Step 16

Endodontic Post Cementation Guide—For Self-Etch Technique Modify Steps 6 and 7 as Shown Below:
See Instructions for Use for complete instructions, warnings, and precautions.
Step 6

Step 7
Testimonials
"I use PermaFlo DC from post to crown. It works every time, has great delivery, and consistently does its job."
Dr. Linda Kronick – Norwich, CT
Frequently Asked Questions
-
Do I use PermaFlo DC luting resin with a total-etch or self-etch system?
PermaFlo DC luting resin is compatible with both, so you can use it regardless of your preferred etching method.
-
What materials can I use PermaFlo DC luting resin with?
PermaFlo DC luting resin can be used with porcelain, lithium disilicate, zircona, porcelain fused to metal, metal alloys, leucite-based ceramics, alumina-based ceramics, mica-based ceramics, gold, and composite.


Customers Also Bought


- 1. Data on file.